Saturday, August 17, 2013

Coconut Macaroons and Mango Sauce


While much of the time we are able to do what we want and try creating new flavor combinations and confections at Kakao (provided we have the time for it), every now and then we have "assignments" or "challenges" for the confectioners at the shop.
I suppose you might call it forced inspiration.
Called Peculiar Pairings, we're given an ingredient or a style and we're supposed to create a confection with it in mind. For example, in the very recent past we've had "Indian" and another using local craft beers. Sometimes the ideas come easier than at other times.
Then there can be the whole question of how to go about making actual the flavor and texture that you happen to envision...

The pairing coming up soon is "comfort food." Well, I couldn't quite come up with anything. I racked my brain trying to think of what I might personally use as comfort food. Suggestions were there, the worst was mashed potatoes, but it was thankfully a joke (what in the world would I do with that even if I wanted to?). I thought of Cheetos myself, and while they fit the bill for comfort food (a good reason I do not buy them) and they do happen to be more usable in their form and texture than the potatoes, I decided that I wasn't ready for Cheetos and chocolate. It might take more finesse than I am able to provide the project. Then again, maybe there's no amount of finesse that would take care of the Cheetos.
Truthfully we do sometimes use things in our confections that one might not immediately expect as appropriate for sweets. But very often, the slightly odd is what people expect from us anyway.


It's not a crunchy, salty snack, but I finally decided on tea for the comfort food I would utilize. Ok, so I suppose it's technically not a food, but I do find tea comforting (in the evening, when it's cold outside, if I'm sick, as an accompaniment to a book). I especially like a good lavender earl grey.
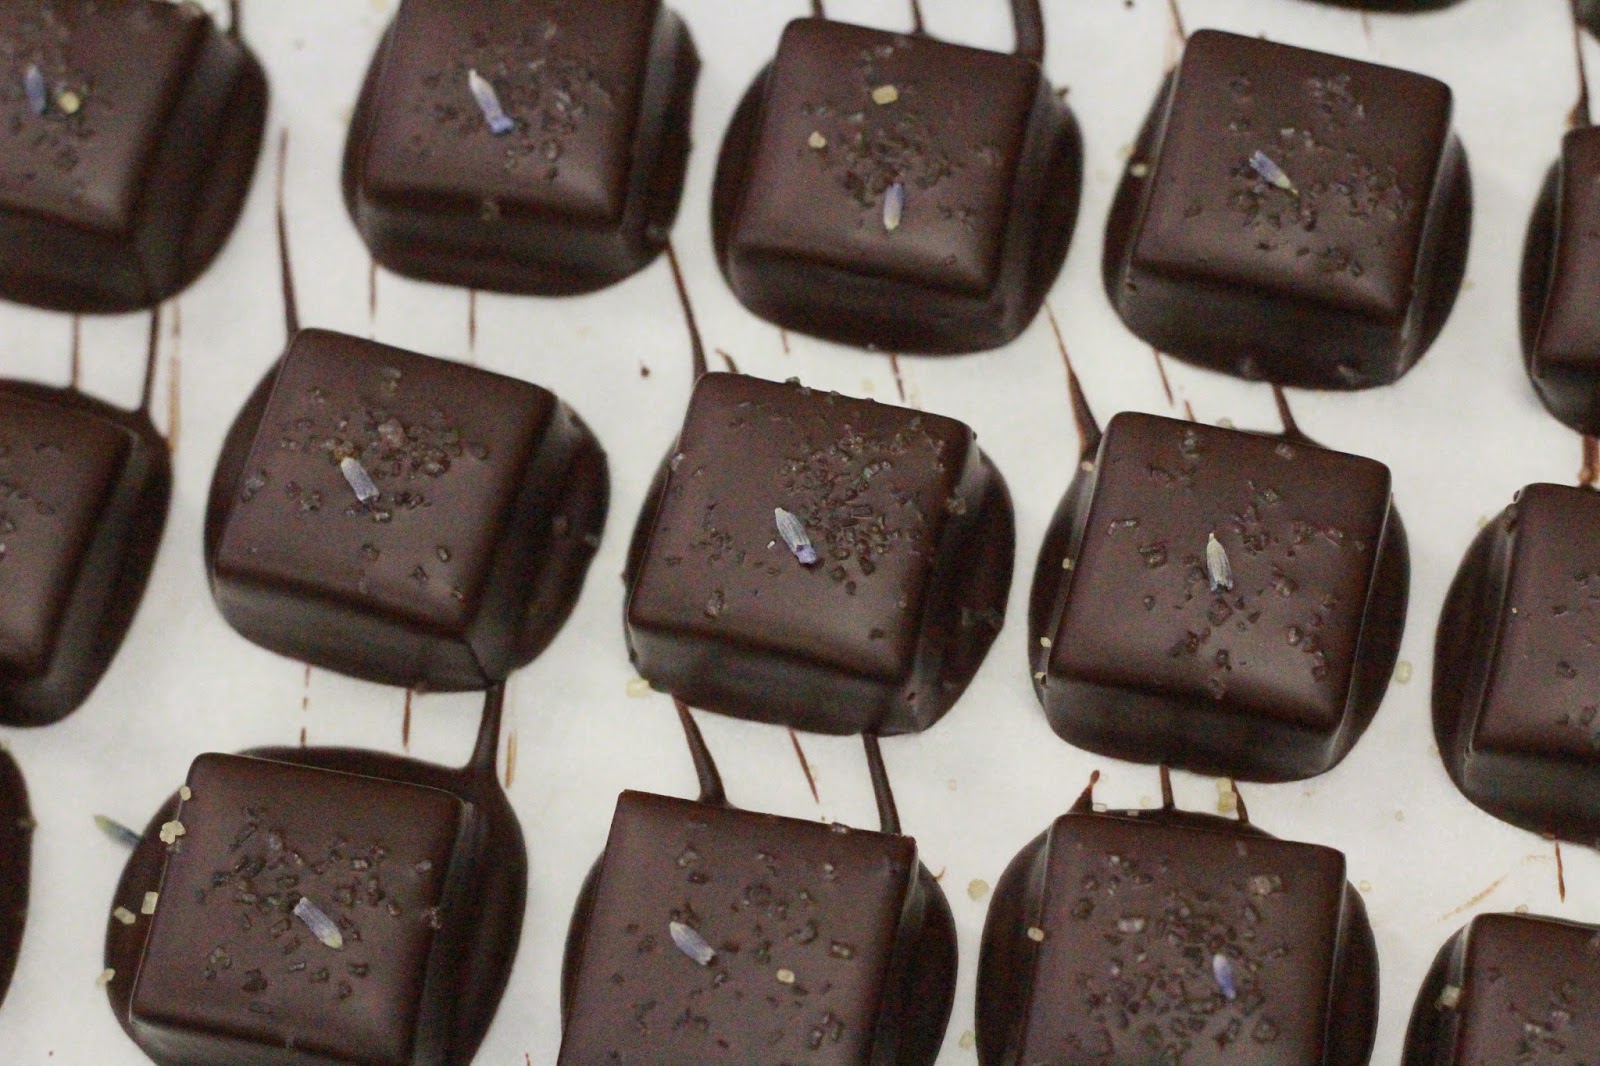
And so, to create the flavor, loose earl grey tea leaves and dried lavender buds were infused in cream. The infused cream was then used to make a batch of caramel. Ta-da.
The caramels were cut and dipped in 72% dark chocolate, topped with a sprinkle of raw sugar for the tea, and one lavender but as an identifier and flavor booster.
While certainly I like it, I have a couple ideas of how I would change it if I made it again...

In addition to all the chocolate, Kakao also carries ice cream from a local ice cream shop. We have two flavors available: a natural vanilla, and classic chocolate.
In addition to the things we have to offer in the day-to-day made in-store (salted burnt caramel sauce, chocolate sauce, lavender syrup...), we also have a specialty sundae every two weeks or so.


Working in a chocolate shop, we're obviously always surrounded by chocolate. Easy access, it's not as tempting as you might think (we often comment on how we really want salt).
Don't get me wrong, it's great chocolate. Most, if not all of us, who work at Kakao eat chocolate every day. The good news is that if you have good chocolate, you don't need as much of it to satisfy a chocolate need.
Maybe that shouldn't be a blanket statement. Maybe quality doesn't matter as much as quantity for some people, but it does for me.


Anyway, the point I was trying to make is that since we're working with chocolate all the time, we frequently crave other flavors. Sometimes it's nice to work with other foods, flavors, and textures to see what we can come up with.
Back to the ice cream...


One of my favorite flavor combinations is coconut and mango, and I especially love good coconut sticky rice with mango for a special dessert following a meal at a Thai restaurant.
So, I wanted to make fresh mango sauce for vanilla ice cream and serve it with a coconut macaroon.


Fresh mango, a little coconut oil, brown sugar, and lime juice... and things turned out pretty well!
(And no, the photo below does not show toasted coconut.)


So, this time around, two recipes in one post, though they certainly don't have to go together (they just did for my purposes).
Use them however you would like.  Or not.
I understand that coconut is one of those things. People are either coconut lovers or coconut haters. The grey area seems very small in this instance, and opinions can be quite strong.
If you happen to like coconut and feel like taking things a little further, temper some good dark chocolate, dip the bottom half of the coconut macaroons, and place them on parchment to set.


As far as the mango-lime sauce goes, it's very nice poured over good vanilla ice cream (sweet and creamy goes well with the fruity and slightly tart sauce- they seem to enhance each other), but it would also be great spooned over cheesecake, with fresh strawberries, or over pound cake with some whipped cream.


Coconut Macaroons
makes about 48, 1 T cookies

14 oz (397 g) unsweetened coconut
14 oz (397 g) sweetened condensed milk
1 t (5 ml) vanilla extract
2 large egg whites, room temperature
1/4 t (1 g) kosher salt
2 T (32 g)  granulated sugar

Preheat oven to 325 F/160 C.
In a large bowl and with a spatula, mix the coconut, condensed milk, and vanilla until well combined. 
In the bowl of an electric mixer fitted with the whisk attachment or with a hand mixer, whip the egg whites together with the salt until soft peaks form. While the mixer is running, slowly add the sugar and continue whisking until stiff peaks form. Gently fold the egg white mixture into the coconut mixture until incorporated. 

Using a small cookie scoop or spoon, portion out the macaroon mixture in about 1 T (visually 15 ml) mounds onto parchment paper lined sheet pans. 
Bake the cookies in the center of the oven 15-20 minutes, until golden, turing the pan back to front about 8 minutes through the cooking time. 

Remove the pan from the heat and let cool before removing the cookies from the paper. 
(*Coconut macaroons freeze well.)


Mango-Lime Sauce
makes a generous pint (more than 473 ml)

about 2 lb. (907 kg) ripe mango
3 T (45 ml) water
1/4 c (50 g) brown sugar
2 T (30 g) coconut oil
1/4 t ( 1 g) salt
2 1/2 T (around 37 ml) fresh squeezed lime juice

Cut the mango fruit from the flat central seed. To do so, I like to use the stem as a guide and cut the "cheeks" away from either side. If it's difficult you may be cutting too deeply, and into the seed. Then score each half mango on the flesh side 3-4 times in one direction to the skin but not through, and then 3-4 times perpendicularly through the flesh so you have a grid cut into it. Flip the skin inside-out so that the cubes you have cut separate from each other and appear to pop out  from the skin. Using a spoon, scoop the cut mango from the skin and into a medium saucepan. Repeat until all the mango is in the pan. Don't forget to peel the skin from the perimeter of the seed and cut the fruit that's still around the seed off into the pan with the rest of the mango. 

Add the water, brown sugar, coconut oil, and salt to the pan with the mango. Simmer over medium-low heat 3 minutes, stirring several times to make sure the fruit doesn't scorch. 
Let the mixture cool slightly and then pour everything into the bowl of a food processor and process until smooth. Add the lime juice and process again until combined. Taste and adjust as necessary (salt, lime juice, a little extra water to thin the sauce).

If not using immediately, let cool completely, place in a covered container and refrigerate until ready to use (the sauce should be fine several days in the fridge). Bring to room temperature before using. 

Wednesday, August 7, 2013

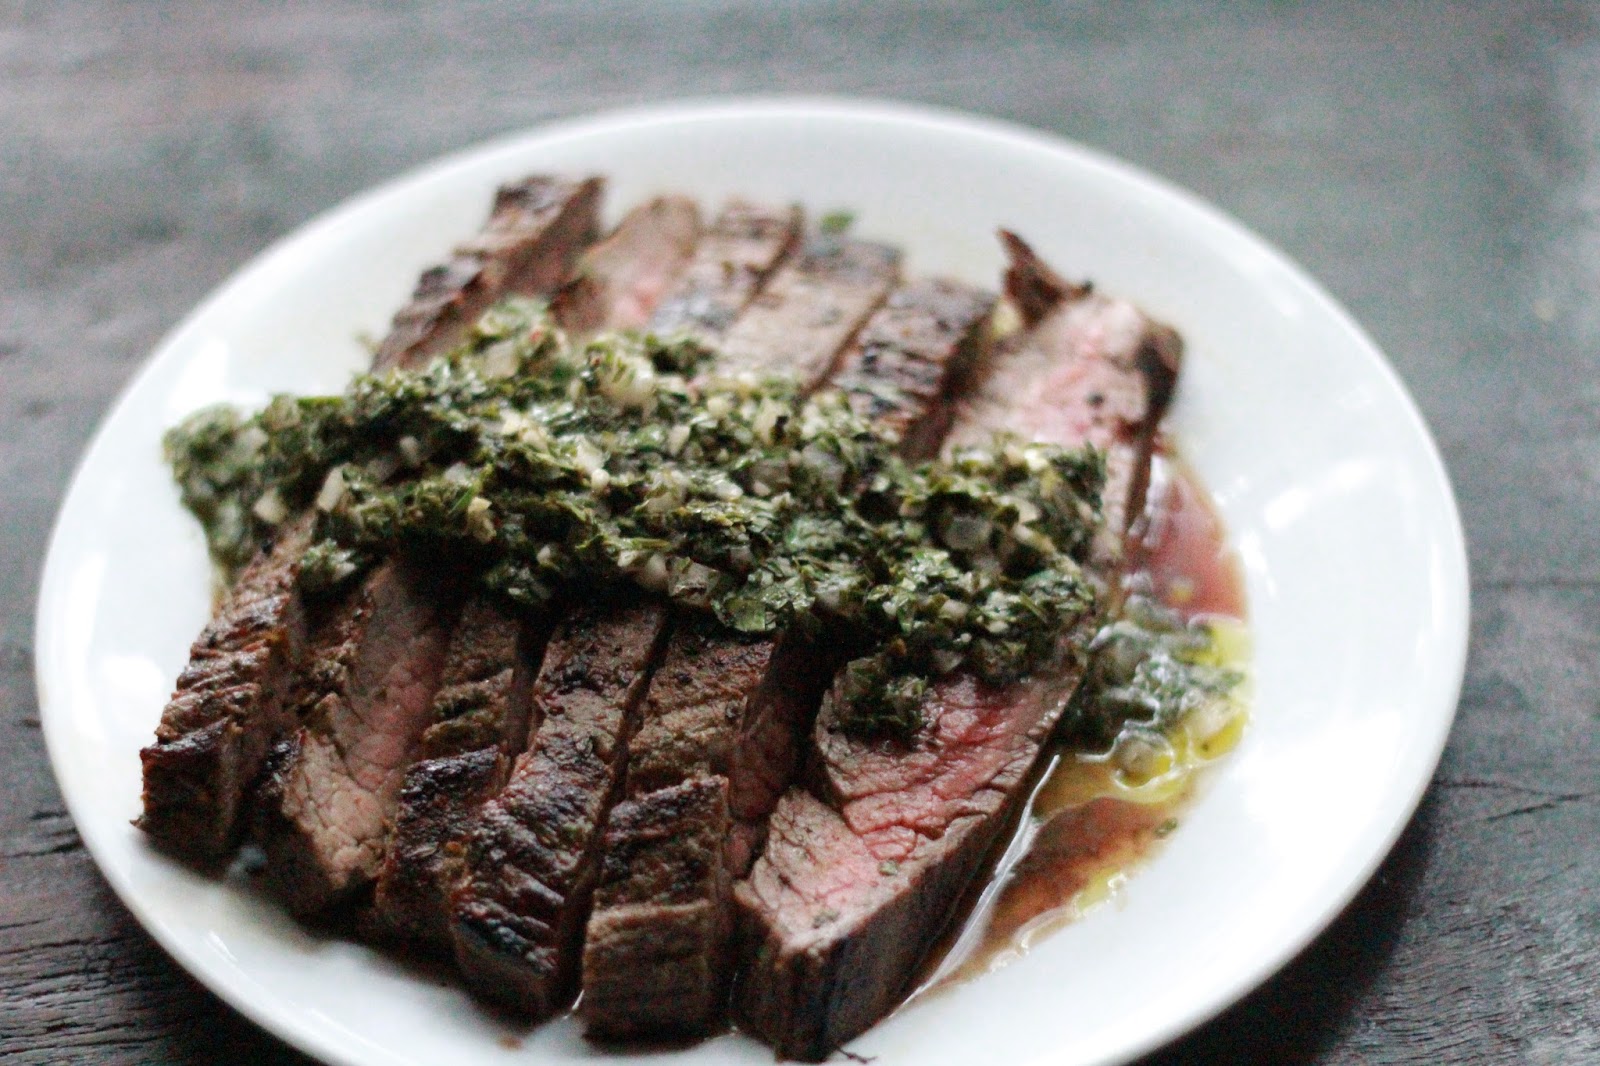
Argentinian-Style Flank Steak and Chimichurri


It's been a while since I posted anything "meat," so I thought it was about time.
Grilled foods are such a nice summery option. The only problem is that I'm not exactly grill-proficient. I do like the grill- vegetables are fantastic and easy to gauge, hamburgers aren't difficult to tackle, and neither are things like a pork shoulder that have a low heat and extremely slow cooking time.


My problem happens to be those things that need a somewhat high heat and more controlled cooking time for a perfect medium-rare. Problem being that I can't seem to obtain the necessary control for long because the grill I use decides to suddenly drop in temperature. It's finished for the day, it's not going to do any more work.
Then the timing doesn't work out because the temperature decided not to cooperate.  You're at the point when you have meat that's partially cooked, but you have no idea exactly HOW cooked it is, and maybe you're not certain how long the temperature was at the desired level before it dropped... well, what is one supposed to do?
Rather than spearing the steak to check it's doneness and lose all the juices, I prefer something a little more consistent from the beginning.
For precision, I prefer to cook on the stove. See, I'm comfortable with that. A grill pan is great, but a heavy frying pan such as one made of cast iron will also work well. The grill flavor may not exactly be there (sorry), but a really nice sear can still be attained.
If you're happy with your grill and comfortable using it for something like this, have at it. I'm sure you'll be pleased.


I give instructions for medium-rare steak because that's what I like. (Although, quite honestly,  this time around I changed things a bit by not paying attention to what I was doing, heating the pan over high, walking away, then dropping the temperature to medium-high after I put the steak in the pan. This seems to be better instruction on a steak that's closer to medium than medium-rare. The real medium-rare instructions are below. My apologies, but there was no time for a "round two" to fix it for photographic purposes.)
That said, cooking your meat more rare or more done is completely up to you. I don't plan to give instruction on how to play Russian roulette food poisoning (do you trust your butcher?) or grill up some nice hockey pucks.  But I don't know that either of those require much instruction- and if that's what you like, it's your dinner.


One other thing is that the cooking method in the recipe is the one I always use for a flank steak: hot pan, salt and pepper the steak, cook on one side, turn and cook on the other, let the meat rest off the heat in the pan.  It's my basic flank steak how-to, and I like how it turns out.
The "different" thing in this case is the marinade and chimichurri (which tastes like green and garlic with a little bite).
Earlier on I had a recipe for some steak and chimichurri, but I think I like this version much better.


If you're looking for a different herby green sauce for flank steak, a fresh basil pesto might be nice.


Oh yes! Speaking to a vegetarian who thought the marinade smelled fantastic (after it sat a while but before the meat went in), we decided it had the potential to make a really nice vegetarian meal. Marinate some meaty vegetables (like mushrooms) and serve the chimichurri alongside...


You'll just have to imagine what the vegetables would look like. 

Argentinian-Style Flank Steak and Chimichurri
serves 4-6
Marinade adapted from a recipe in Gourmet, August 2008 (originally adapted from Abingdon Manor)

Marinade:
1/4 c (60 ml) vegetable oil (sunflower, peanut)
1/2 c (120 ml) white vinegar
1/2 c (32 g) chopped fresh cilantro (stems are fine to use)
3 large cloves garlic, minced
2/3 c (80 g) chopped onion
1 T (2 g, or 15 ml if weight is too small to measure) fresh minced thyme leaves 
2 t (1 g, or 10 ml) fresh minced oregano
1 1/2 t (5 g) ground cumin

1 1/2- 2 lb (680-907g) flank steak

Before cooking: kosher salt and freshly ground black pepper

Chimichurri:
1/4 c (60 ml) red wine vinegar
1/4 c (60 ml) olive oil
1/4 c (33 g) minced onion
3 cloves garlic, minced 
1 1/2 t (7 ml) lemon juice
1/3 c (24 g) minced fresh parsley, lightly packed
2 t (3 g, or 10 ml if weight is too small to measure) minced fresh oregano
a nice pinch of hot red pepper flakes
1/2 t (2 g, or 2.5 ml) freshly ground black pepper
3/4 t (6 g) kosher salt


In a large resealable plastic bag, place the oil, vinegar, cilantro, garlic, onion, thyme, oregano, and cumin. Mix the ingredients to combine well, and place the flank steak in the bag. Coat the steak in the marinade, remove excess air from the bag, and seal.  Of course, this could easily be done in a bowl, but you may have to turn the steak a few times so it all marinates evenly. Refrigerate 4-5 hours. 

While the steak marinates, make the chimichurri. 
Stir together all chimichurri ingredients in a medium bowl. Set aside and let stand at least 2 hours so the flavors meld. 

When ready to cook the steak, heat a large heavy frying pan or grill pan over medium-high heat a couple minutes. Remove the steak from the bag and wipe off excess marinade. Generously salt and pepper the steak and place the steak seasoned-side down in the hot pan. Salt and pepper the other side as the first side cooks. For a 2 lb. steak, cook 8 minutes per side for medium-rare. For a smaller steak, 1 1/2 lb., maybe 7 minutes per side.  
When the first side has finished cooking, flip the steak and cook on the other side. Remove the pan from the heat and let the steak rest in the hot pan about 10 minutes. 

Slice the flank steak against the grain and serve with the chimichurri. 

Thursday, August 1, 2013

Peaches in Lavender Tea


Just recently, I saw a recipe for a fruit salad steeped in chamomile tea. It sounded interesting... the only problem was that I really don't like chamomile. At all.
I'm not partial to that mouth-full-of-pollen taste that (in my opinion) goes with chamomile.
Honeys with strong pollen tastes, or anything that tastes at all like any type of little white flower is not for me.
And so, a way to improve upon the idea and fit it to my own preferences was to instead make use of lavender.


The use of a tea in which to marinate fruit is certainly a different way to add flavor, and the end result turns out to be a refreshing change.
In this case lavender isn't too bold, but understated, and seems to pair well with peaches.
(Because the flavor combination is likely not a familiar one, you'll just have to trust me on this one.)
The tea lends a bit of perfume to the fruit- and while some may be able to identify the flavor, others may not.

And with a light meal, a simple fruit salad can be practically perfect ending. 


If you want to add some richness to the dish, maybe try topping with a little whipped cream, or serve the fruit with vanilla ice cream (although the lavender flavor becomes a little blunted with the addition of cream).


Peaches in Lavender Tea
serves 4-6

4 large ripe peaches
2/3 c (160 ml) water
2 teaspoons lavender tea (or dried lavender)
1 T (16 g) sugar (vanilla sugar if you have it)
1 T (15 ml) lemon juice
6 oz (170 g) raspberries

Bring the water to a boil and pour into a heat-safe cup or dish. Add the lavender to the hot water and let steep 5-7 minutes. Strain the tea, removing the lavender buds, into a large bowl. Add the sugar and lemon juice and whisk until the sugar is dissolved. 
Cut each peach into 8-12 slices and add them to the bowl with the tea. 

Marinate 15 minutes, gently tossing a few times. Add the raspberries and toss gently again.
At this point the fruit and syrup can be served in dessert bowls, or refrigerated an hour or two and served cold.


Friday, July 26, 2013

Baked Ricotta with Figs


A sweet baked ricotta is much like a crustless type of cheesecake... although if you're expecting it to be the smooth/rich/creamy cream cheese style of cheesecake, you may be disappointed.
Ricotta cheese's texture definitely isn't the same as cream cheese, so please keep that in mind. 
It's not bad, it's just different.
And as compared to other, more traditional types of cheesecake, this version is lighter.


The brown sugar gives the baked ricotta a caramel-y flavor.  If you don't have access to brown sugar, granulated sugar would be fine. But if you end up using granulated sugar, maybe consider adding a little fresh lemon or orange zest.
Perhaps lemon zest if you serve it with fresh figs and orange zest if you plan to roast the figs?


As for fresh figs, they can usually be found between summer and autumn.
I think I prefer the fresh fig variation for summertime, and the roasted style of this dish for the autumn.


The figs make a beautiful and flavorful addition to the ricotta, whether you choose to serve them fresh or cooked.  Fresh figs are lighter and more floral in flavor, perfectly perfect in taste and presentation when ripe and halved. The roasted figs are more intense and earthy, and open up to look like a flower or starfish as they cook.


I like the idea of a lighter honey for the fresh figs, and a deeper honey for the roasted figs.


Baked Ricotta with Figs
makes 5 servings

15 oz (425 g) whole milk Ricotta
2 T (30 ml) cream
2  large eggs, slightly beaten
1/3 c (83 g) brown sugar, packed
Salt, a generous pinch
1 t (5 ml) vanilla extract
5 large, or 10 small fresh, ripe figs
Honey

Optional: toasted sliced almonds, walnuts, or pine nuts

Preheat the oven to 350F/180C.
Butter the bottom and sides of 5, 6 oz (177 ml) ramekins and set aside. Place the ricotta, cream, eggs, sugar, salt, and vanilla in a medium bowl. Whisk until well combined.  Divide the ricotta mixture between the prepared ramekins and bake on the center rack about 25 minutes, or until the tops are golden and the centers are set.
Remove the ramekins from the oven and let cool at least 10-15 minutes.
The ricottas can be served warm or at room temperature.

To remove the a baked ricotta from the ramekin, place a plate (topside down) over the top of the ramekin. Using both hands and holding tightly, invert both the plate and ramekin so that the ramekin is upside-down over the plate. Continuing to hold tightly, give the ramekin and plate several good shakes until the ricotta falls out of the ramekin and onto the plate.

Garnish with halved figs and drizzle with honey.
Sprinkle with toasted nuts if desired, and serve.


Roasted Fig Variation:

5 large, ripe, fresh figs
Butter
1 T (15 ml) honey
1 T  (15 ml)water


Preheat the oven to 400F/200C.
Remove the stems from the figs and coat the outsides lightly with olive oil (to do so, pour a small amount of olive oil onto one palm, rub your palms together, then massage the outsides of the figs lightly with the oil). Cut the figs from the top almost through the bottom, making two perpendicular cuts to form a cross pattern. Place the figs in a roasting dish and add a dab of butter to the center of each cut fig. Drizzle the figs with the honey.
Roast the figs 10-12 minutes (turn the pan halfway through the cooking time), until they are soft and have fully opened flat.

Turn off the oven and gently remove the figs from the pan. Add 1 T water to the pan, swirl the mixture, and return the pan to the hot oven for about 1 minute. Remove the pan from the oven, and stir the mixture to fully combine the honey sauce.

To serve, place  a warm fig on top of each baked ricotta and spoon a little sauce over the top of each. 


Friday, July 19, 2013

Cucumber and Feta Salad


Cucumbers definitely have their own flavor: light, fresh, cool and green.


While technically a fruit, most of us probably use cucumbers as a vegetable. 


Because they are so mild, they can work well with a variety of other ingredients, but they seem to do particularly well with other things things that have "fresh" flavors.


Cucumbers act a bit like a sponge- taking on other flavors, but they are still able to hold their own and maintain their uniqueness.


I think this is a good example of a classic cucumber-based dish. It's an easy to prepare and refreshing summer salad, Greek in flavor, and one we've been eating quite a bit lately.


The flavor combination is perfect with the salty and slightly tangy feta and the fresh herbs.


It works very nicely as a side with grilled meats, or even with pita or crackers.


Cucumber and Feta Salad
serves 6 or more

3 large English cucumbers (about 1 1/2 lb or 700 g prepared)
coarse or kosher salt
1/4 c (60 ml) olive oil
1 T (15 ml) water
1 1/2 T (about 22 ml) lemon juice
6 oz (170 g) feta cheese, crumbled
freshly ground black pepper
generous 2/3 c (110 g) diced red onion
generous 1 T (5 g) chopped fresh mint
generous 1 T (5 g) chopped fresh parsley
generous 1 T (5 g) chopped fresh dill

Peel and seed the cucumbers. Cut cucumbers into a large dice and salt them with 2 t (14 g) salt. Toss the cucumbers and place in a colander over a bowl. Let the cucumbers sit 30 minutes to 1 hour to drain, shaking the colander occasionally. 
While the cucumbers drain, mix the olive oil, water, and lemon juice in a small bowl. Set aside. 
Once the cucumbers have finished draining, give the colander one last shake and place the drained cucumbers in a large bowl. Add the previously prepared lemon juice dressing, the feta cheese, several good grinds of black pepper, the onion, mint, parsley, and dill. 
Fold the salad together to combine. Taste and season as desired with extra salt, pepper, and/or lemon juice. 

Thursday, July 11, 2013

Red Plum Jam


The other day we were given red plums by a friend- it seems some of the branches broke off the tree because they were so heavy with plums.
We'll happily take them, of course, but I don't think we could eat them all before they start to turn.
Something needed to be done.
The best way to quickly dispatch a weighty gift of plums...?


Jam comes to mind.
The difference between supermarket plums and plums fresh off a tree? In taste, color, texture, and scent there's no contest.
It doesn't matter if they're bruised, it doesn't matter if they're overly juicy. In fact, it's great.
They smell wonderful! Fruity, floral, a little tangy.
Some were red as garnets inside, others with flesh a combination of red and gold.
And when the jam began to cook, the fruity perfume wafting from the pot was like no other- it's sort of intoxicating.  Someone is going to have to start marketing a red plum perfume.


Not too sweet, tartness intact (but I like it a bit tart).


So, it seems I've been making jam quite a bit. 
It's not completely intentional. It just happens.


If you happen to have plums but don't want to make jam, there are other options. Eating them fresh is an easy one.  A crostata, if you like the idea, is a fantastic option. Really ripe plums, crème anglaise, and some toasted almonds sounds pretty good, too.
Fruit desserts are always welcome in the summer.


Plums naturally contain pectin, so if you plan to make jam, there should be no problem with it jelling properly.  However, since fruit can vary so widely, there shouldn't really be a set time for when jam is finished when you don't use commercial pectin- especially when you're cooking a large quantity. It depends on how juicy the fruit is, how much the jam has to reduce before it jells, your stove...
For me, it took about 65 minutes to reach the point I was looking for. If your plums are particularly juicy, maybe this will be about right for you.


Other options that might be nice with plums:
strawberries
raspberries
orange zest
vanilla bean
a little cinnamon
some fresh ginger


Red Plum Jam
made about 4 1/2 pints (a little more than 2 L)

5 lb. (about 2.26 kg) ripe red plums
3 1/2 c (700 g) sugar
zest of 1 lemon

Quarter the plums (skin on), discarding the pits, and place the fruit to a large non-reactive pot. Add the sugar and lemon zest and stir until all the plums are coated. Leave the mixture to sit 1-2 hours, stirring occasionally so the plums release their juices.

Place a small plate in the freezer.
Heat the pot over medium and bring the mixture to a boil. Reduce the heat to a simmer and cook until the jam reaches the jelling point. While the jam cooks, skim off any foam that rises to the top. 
To check if the jam is set, remove the plate from the freezer and place a small amount of the jam on the place. Return the plate back to the freezer and let it set a few minutes before removing it again. Using a finger, nudge the jam. If it wrinkles, it should set just fine. If not, try again after the jam cooks a while longer. 
Ladle the jam into clean jars and screw the lids on (be careful, the jars will get hot).
*Process the jars of jam at this point if you would like them to last longer and be shelf stable. 
Let the jars sit at room temperature until you're able to handle them easily then place the jars in the refrigerator.
Jam should last at least a month and up to several if kept refrigerated. 


Sunday, July 7, 2013

Gluten-Free Chocolate Layer Cake


One of my sisters was visiting this week, just before her birthday, and I was luckily able to make her a birthday cake. I wasn't able to make one when one of my other sisters was here around her birthday (very sorry about that), but maybe we can remedy it with a very belated birthday cake next time you're in town.

Not that everyone is going to want a recipe for a rich chocolate cake in July, but it may come in handy some day.

I knew a great gluten-free chocolate cake to use as my base...


Gluten is a protein found in many grains including barley, wheat, and rye. It's what makes dough elastic and it's what gives bread it's characteristic springy texture.  While it's contained in many grains, it is not in all grains. Rice, millet, and quinoa are all examples of grains without gluten. 

Working with gluten-free flours can be kind of a challenge, but it can also be fun to experiment. And it's certainly an interesting learning experience. Too much of one type may make a finished cake gummy and unappetizing, too much of another could lead to a tough cake, using too much of a third kind may cause things to be too crumbly, another may have too strong a flavor if used alone.
Different flours have different textures, different shades, different properties, different flavors (and that's why it's a good idea to use a combination of flours). For example, coconut flour adds a nice flavor, but if you happen to use it, you'd want to use extra liquid as it absorbs a lot. Almond flour, on the other hand adds protein to baked goods and gives a nice nuttiness as well as moisture to the finished product. Great examples though they may be in my opinion, neither of those are used in this recipe.


In the above photo, the flours used in this particular chocolate cake are pictured.
In order, 1-5, the flours are: glutinous rice, sorghum, millet, tapioca, and cornstarch (with cocoa powder in the center). Without knowing anything else, one only needs a quick to look to see these flours have variations in color and texture.


While it doesn't contain gluten, glutinous (or sticky) rice flour is obviously light and very fine. It adds a light texture to the cake. Sorghum is slightly earthy and adds a little nutty sweetness. Millet, which to me has a scent like a sweet buttermilk pancake mix, helps create a cakey texture along with flavor benefits like those of sorghum (and both of these two add protein and fiber). In a cake, tapioca flour aids in a springy texture and it, along with  cornstarch, acts as a thickener.


Although I certainly don't know everything there is to know about them, I do like to play around with the gluten-free flours- especially if I have a recipe in front of me as a springboard.

A tip: if you want to try using different gluten-free flours, it's best to substitute little by little and see how a recipe changes. 


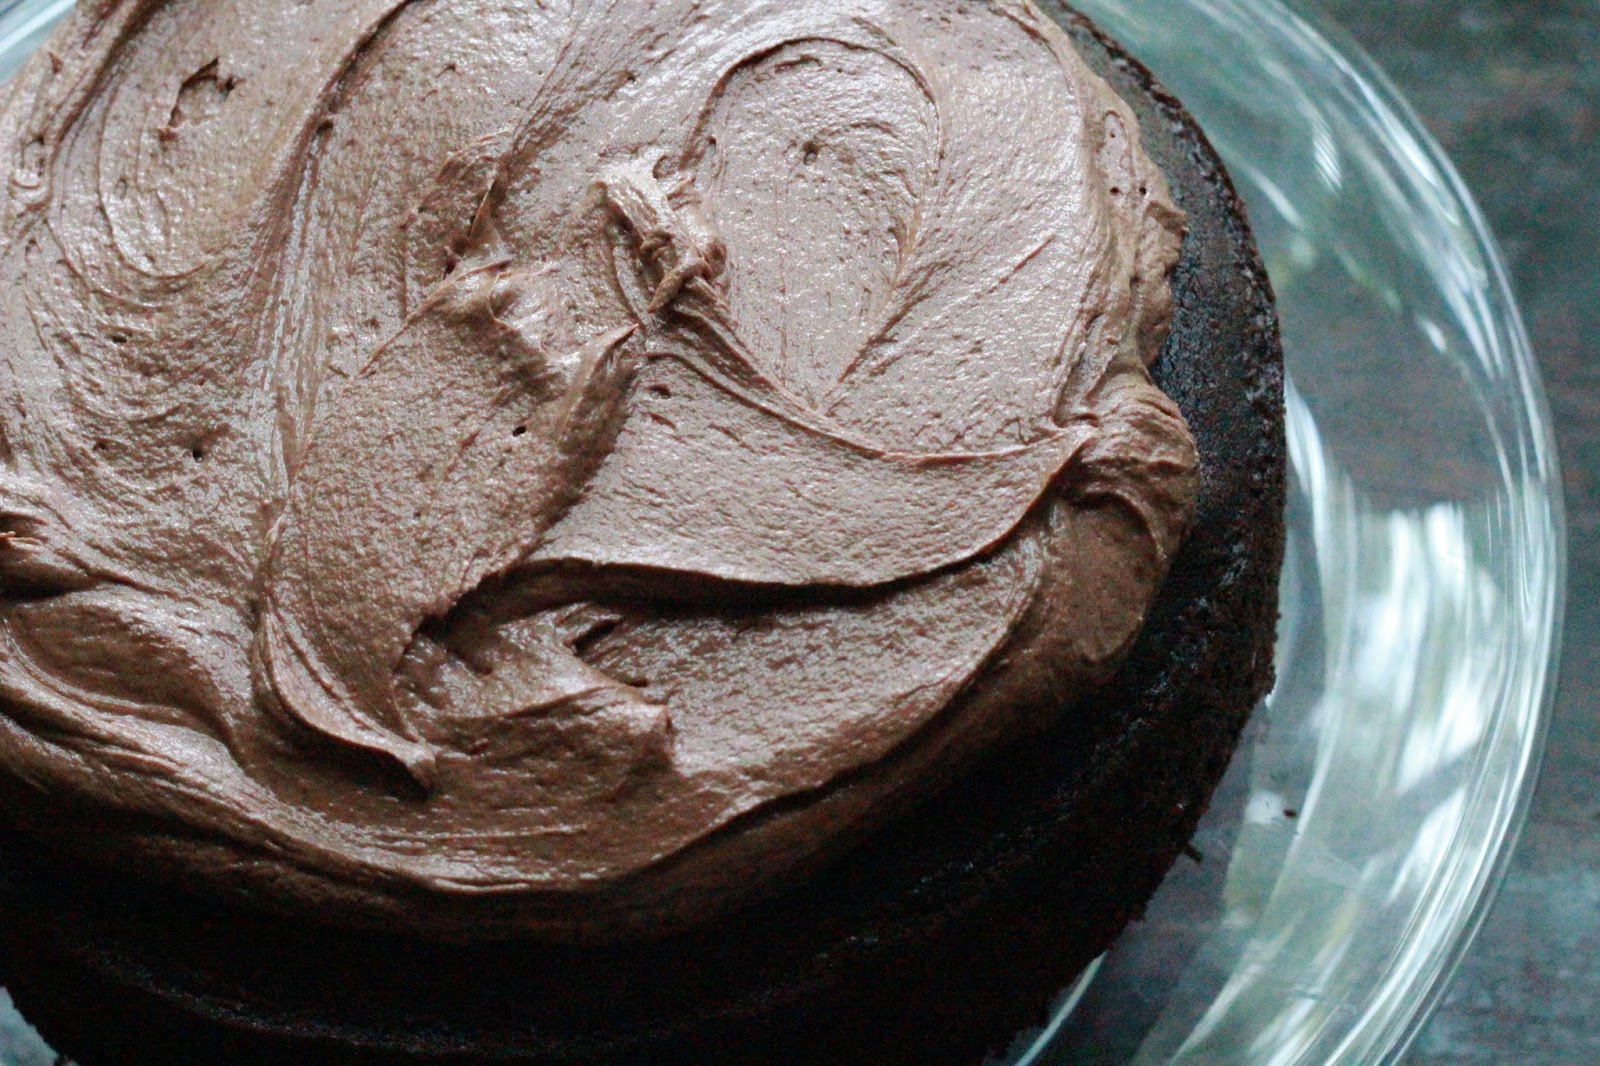
The cake was a hit, so it's a recipe that can be saved for another celebration, another time. Although for anyone under the age of four present, frosting was probably the only draw (why else does one eat cake?).  I suppose that could be considered an endorsement for the frosting... unless, of course, all sugar is equally good.


This one is a combination of three recipes.
I always like the idea of a little fruit with my chocolate. Raspberry is a wonderful partner for chocolate- it can cut some of the richness quite nicely, but at the same time compliment it so well. And since jam makes such a simple and lovely cement between the  layers of cake, we decided to go with a raspberry jam filling.

As for the frosting I initially just wanted a ganache. But because it's summer I thought maybe I should go with something a little lighter. 
It's a bit ironic that something can be lightened with the addition of butter.


Of course, the complete recipe could be cut down to two if you would like to use store-bought raspberry jam or extra chocolate frosting as the filling between layers (... or go with something completely different).


Gluten Free Chocolate Cake
serves 12 to 16
cake recipe slightly adapted from Blackbird Bakery Gluten-Free by Karen Morgan
makes 1, 8 or 9-inch round layer cake (20-23 cm)

1/4 c (28 g) sorghum flour
1/2 c (70 g) cornstarch
1/2 c (65 g) millet flour
1 c (118 g) glutinous rice flour
1/2 c (58 g) tapioca flour
2/3 c (53 g) cocoa powder
1/2 t (2 g) guar gum
2 1/2 t (11 g) baking powder
1/2 t (4 g) kosher salt
1 1/4 c (258 g) sugar
8 oz (226 g) unsalted butter, at room temperature
4 large eggs
1 c (240 ml) whole milk
3 T (45 ml) vanilla extract
1/2 c (120 ml) peanut oil or another vegetable oil

Raspberry jam (recipe follows, or use store-bought)
Chocolate ganache buttercream (recipe follows)


Preheat the oven to 350 F/175 C, with racks placed in the center.
Butter the inside of two 8 or 9 inch round cake pans (somewhere between 20 and 23 cm). Line the bottom of each pan with parchment paper. Set the pans aside.
Combine all the dry ingredients in the bowl of a stand mixer fitted with the paddle attachment and mix on low several minutes until well-combined. Cut the butter into 16 pieces and add it to the flour mixture. Beat the mixture on low several minutes, until the butter is incorporated throughout and the mixture resembles wet sand in texture.
Lightly beat the eggs in a medium bowl. Add the milk, vanilla extract, and oil. Pour the wet ingredients into the dry and beat on low speed about a minute until the dry ingredients are moistened. Increase the speed to medium-high and beat a few more minutes until the cake batter is smooth.
Divide the batter between the two prepared pans and smooth the top with a spatula. Bake the cakes until a toothpick inserted near the center comes out clean or with a few crumbs clinging to it (25 minutes or so for 9 inch pans, or about 30 minutes with 8 inch pans), rotating the pans about halfway through the cooking time.
Remove the cakes from the oven and let cool 5 minutes. Run a knife along the perimeter of each cake and turn the cakes out onto a cooling rack. Peel the parchment paper from the cakes, flip the cakes top side up and let cool completely. 


Quick Raspberry Jam
makes about 1 1/2 c (360 ml) 

1 lb. (458 g) raspberries, rinsed and drained
1 1/3 c (285 g) sugar
zest of 1/2 lemon, finely grated
1 T (15 ml) freshly squeezed lemon juice

Combine all ingredients in a medium saucepan and bring to a boil over medium heat. Reduce the heat to low and simmer 15 minutes, stirring occasionally at first and then more often nearer the end of the cooking time. Remove the jam from the heat and let cool. If not using soon after cooling, place the jam in clean jars and refrigerate.


Chocolate Ganache Buttercream Frosting

1/2 c (120 ml) heavy cream
5 oz (142 g) good quality dark chocolate (chopped if in large pieces)
4 T (56 g) unsalted butter
2 1/2 c (300 g) confectioners sugar
1/2 t (2.5 ml) vanilla extract

Heat the cream in a small saucepan over medium heat until just simmering. Add the chocolate, remove the pan from the heat and stir until smooth. Let the ganache cool completely.
In the bowl of an electric mixer fitted with the paddle attachment cream the butter until smooth. Add the cooled ganache and stir until incorporated.  Reduce the mixer speed to low and slowly add the confectioners sugar to the chocolate mixture. Once all the sugar has been added, increase the speed and whip the frosting until smooth.  Scrape down the side of the bowl, add the vanilla extract, and whip the frosting about a minute more. 


When ready to finish the the chocolate layer cake
Cut one of the cakes horizontally through the center. For a more accurate central cut, rotate the the cake while cutting with a large serrated knife- at first with a shallow cut around the outside edge, then cutting deeper with each rotation. It's a little easier if you have a piece of parchment to aid in turning the cake. Carefully separate the top layer from the bottom and place the top side down on a large plate or cake stand. 
If using raspberry jam, spoon about 1/3 c (80 ml) of jam onto the cake. Spread the jam evenly across the cut side of the cake and place the other cut side down on top of the jam layer. 
Spoon another 1/3 c (80 ml) of jam onto the cake and spread evenly. 
Cut the second cake in the same manner and place the flat side (bottom) of the cake on top of the jam. Add a third layer of jam and top with the last piece of cake, top side up. 

Place a few toothpicks in the cake, and refrigerate at least 30 minutes to make sure the layers join together (this can be done a day or two in advance if the cake is wrapped well). 

Remove the cake from the refrigerator, remove the toothpicks from the cake, and frost with the chocolate ganache buttercream frosting.  
Let the cake sit at least an hour so that the frosting sets before serving.
Store any left over cake in a cool place.