Monday, February 17, 2014

Shaved Brussels Sprout and Kale Salad


Using seasonal vegetables is a great thing, and the even better news is that there are such things as winter vegetables. Perhaps the variety isn't as great, and the colors aren't as flashy as those vegetables in other seasons, but they do exist.


As it so happens, vegetables belonging to the cabbage family fit the bill.
Those cruciferous vegetables (broccoli, cauliflower, Brussels sprouts, cabbage, kale...) can certainly be grown year-round, but are sweeter in flavor when harvested during cooler months.


Things like cauliflower and Brussels sprouts definitely have a solid place in the winter vegetable canon, there's no denying it.


Semi-conversely, I'm not so sure about Brussels sprouts in July- they just don't sound as appetizing (yes, we're all aware that some would say they never sound appetizing).
The same goes for that dark green, plastic/rubbery looking leaf that's so wonderfully put to use by caterers to beautify trays and in buffets (it hides the crushed ice so well). Yes, it's kale, and it is edible- unless it really is the faux kale and truly made of plastic (officially inedible, or at least not very good for you).


The raw texture of kale and Brussels sprouts is hearty, not delicate, and they can withstand some strong flavor combinations well without being overpowered themselves.


Bite from mustard, zip from lemon, fruity green from good olive oil, while the vegetables are more of an earthy green- especially when raw.
Parmesan adds a bit of creamy nuttiness.


One really nice feature about this particular recipe is that the salad can be made in advance. In fact, it's good the day after it's put together. How many salads can you say that about?


I didn't toss them in this last time, but I think I would really enjoy this salad with a nice handful of toasted pine nuts.


If looking to make this a complete meal, perhaps consider adding a poached or hardboiled egg.


Raw Shaved Brussels Sprout and Kale Salad
based on a Saveur recipe
serves 6

1 lb (about 450 g) Brussels sprouts
1 bunch lacinato kale (maybe 15 leaves)
1 medium garlic clove, minced
finely grated zest of 1 lemon 
4 T (60 ml) fresh lemon juice
1 1/2 T (27 g) whole-grain mustard
1/2 c (120 ml) good extra-virgin olive oil
coarse salt (maybe kosher or grey salt)
freshly ground black pepper
fresh Parmesan, shaved with a vegetable peeler


Wash the kale and brussels sprouts. 
Remove the stem from the center of each leaf of kale and cut about 1 cm wide on the diagonal so you have rough ribbons. Place the kale in a large bowl and set aside. 
Thinly slice the Brussels sprouts (with mandolin or a knife) from top to bottom, holding each sprout by the stem end. Discard the stems and place the sliced Brussels sprouts in the bowl along with the kale ribbons. 

Make garlic paste by sprinkling a moderate pinch of coarse salt over the minced garlic on a cutting board. Using broad knife, smash and scrape the garlic and salt, dragging the side of the knife across it several times with some force until you have achieved a uniform paste. 
Place the garlic paste in a large bowl along with the lemon zest and juice and mustard. Whisk to combine. While whisking continuously, add the olive oil in a slow stream until all has been added and the dressing is emulsified. 

To the dressing bowl, add the shaved greens. Toss several times to coat with the mustard dressing then taste. Season with salt and pepper as desired, toss again thoroughly and taste again (and season again as necessary). 

Mound the salads on individual plates and sprinkle with shards of shaved Parmesan cheese. 

Monday, February 10, 2014

The Pantry


This is something I started a while back, and it's been written because one of my sisters asked me to do so.
Apparently she was trying to look up what should be included in a well-stocked pantry, but could only find lists of things she deemed "weird" and "random."
I guess we're talking basics here- things you want around and not have to run out to the store to purchase, but I don't know how basic I'll actually be.
Maybe it's reality for some people, though others might say they have no use for something I think important.
In that case, maybe it's an example of well-stocked for Natalie's purposes.
Frankly, I don't believe anyone's going to print out this list and take it to the store with them, and I don't think there are many out there building a pantry from scratch.


These things I list should last a while shelf-life wise, and at least a week for those that expire (and for that you would check out the expiration date on the milk to be sure).
Fill in with things that you should be purchased closer to the dates they're used: meats, salad greens, many fruits and vegetables other than those I have listed.
I'm not saying anyone needs to really stock up on the perishables. Those weeks you NEED three gallons of heavy cream are probably few and far between in a home kitchen (and then the issue of economy can come up once it's gone bad and you've used less than a half gallon).  A pint, however, is a more appropriate amount.
And there's the question, what are five ingredients you always have in your shopping cart? Mine would probably be fresh garlic, fresh lemons, kosher salt, whole black peppercorns (to grind), and wedge of real Parmesan cheese (no green shakers). But then if I start thinking about other things, I wonder about whether I need to substitute good olive oil for something.... and are the salt and pepper understood, or do they have to stay on the five-things-only list? I'll keep thyme in the garden, so that's not an expense to worry about.


Then again, the whole idea could make a good challenge: you will have a plain chicken breast, salt, and pepper. You may have 4 other things to make up a completed dish. What will you do?
My only other comment is to buy the best you are able. Assume the word "good" precedes each item. You generally pay for quality. If organic is important to you, please buy it. If small businesses are important to you (and small and/or local farmers trying to eek out a living), please support them.
And if you're partial to Wal-Mart, I don't really want to hear about it. But if that's what you can afford, that's fine.
One other little thing: beet sugar and cane sugar are not the same thing (and a sugar beet is not the same as the commonly known beet root). They may have the same chemical makeup, but they don't behave the same way, and cane sugar is the winner in comparative tastes of finished products. I would rather not listen to the salesmen on the subject, but instead to the people who use mass quantities of it every day.
Plus, think of all the happy children in Hawaii who benefit from your purchase of pure cane sugar.


Sweeteners
sugar (raw if you can)
brown sugar
golden syrup (mmmmm)
real maple syrup
molasses
honey


Dairy
Parmesan cheese
heavy cream
whole milk
plain yogurt
butter (both salted and unsalted)
large eggs


Grains/Nuts/Seeds/Dried Beans
basmati or jasmine rice
arborio rice
millet
quinoa
whole oats
polenta
raw almonds
pecans
walnuts
sesame seeds
popcorn
several varieties of dried beans (black, lentils, split peas, cannellini, etc.)


Oils and Vinegars
olive oil
sunflower oil
white wine vinegar
red wine vinegar
balsamic vinegar
sherry vinegar


Spice Cabinet
kosher salt (plus grey salt, fleur de sel, and maybe another type or two if it's up to me)
whole black peppercorns or a blend (and a pepper grinder)
dried thyme
dried oregano
bay leaves
cinnamon
cumin
cayenne pepper
curry powder
whole nutmeg
whole cardamom
whole cloves
real vanilla or vanilla beans (if not real, I'd personally not want anything)


Cans/Boxes/Jars
chicken broth
vegetable broth
whole tomatoes (in a glass jar or lined can)
a variety of beans
chickpeas
Dijon mustard


Baking
AP flour (if you use it, and/or  a variety of GF flours if you're using them)
aluminum-free baking powder
baking soda (bicarbonate)
cocoa powder
dark chocolate


Vegetables
carrots
onions
potatoes
celery
garlic


Fruit
lemons
dried cranberries
dried apricots
raisins
shredded coconut

Bonus
fresh parsley
fresh rosemary
fresh thyme
fresh ginger root

Sunday, January 12, 2014

Oatcakes


I've always liked granola in all forms: homemade, store bought, raw, baked, bars, loose cereals, shards and clusters for snacking...

This time the aim was a granola bar in muffin form, containing many of my favorite granola accoutrements.
I wanted something potentially portable, certainly substantial and filling, good with a cup of coffee or tea, for breakfast or a snack, not sticky, not tooth-achingly sweet. 
Instead they turn out to be lightly sweet, with a toasty, almost brown-sugary caramel flavor. 


The bit of batter helps hold together the oats, nuts, and coconut, without being the more common sticky "glue" that holds many granola bars together.
Really, the texture is pretty nice: nubbly with a bit of crunch, craggy, a little crumbly.  
And in the end I even think they're pretty to look at.


Because I didn't particularly want to make an extra trip to the store, I went with what I came up with after going through the grain stashes and some of the pantry staples at home. Luckily it didn't turn out too shabby. 


By this time I've made the recipe twice, and I'm thinking about other things I could do with it. 
In truth, and I suppose it's the easiest way to go, I mostly found myself thinking of particular granola flavors I enjoy. 
Perhaps another time I'll end up adding dried fruit (blueberries, cranberries, cherries, chopped apricots) or a mashed banana, maybe switch up the nuts and seeds. 
Then again, the basics are always good...


As they cool, the muffins end up with a crust- but a crust that easily gives way to an oat-packed interior without difficulty- dense without being rock hard.
And actually (coincidentally, and happily), this project ended up tasting very similar to one of my all-time most favorite granolas.


Oatcakes
makes 12 standard-sized muffins
based on a recipe from Heidi Swanson's Super Natural Every Day

2 1/2 c (260g) old-fashioned rolled oats (GF if that's what you're looking for)
1/3 c (74g) raw millet
1 c (128g) sorghum flour
1/2 c (62g) teff flour
1/2 c (52g) tapioca flour
1/3 c (53g) sunflower seeds
1/2 c (42g) shredded coconut
1/2 c (84g) raw sugar (turbinado, or brown sugar if you don't have raw) 
1 t (3g) cinnamon
1 t (6g) baking powder
1 1/2 t (10g) salt
1/3 c (80ml) honey
1/3 c (80g) coconut oil
5 T (72g) unsalted butter
2 large eggs, lightly beaten

Preheat the oven to 325F/160C.
Grease a 12-hole standard-sized muffin tin with coconut oil or butter (alternatively, place cupcake papers into the muffin tin).
Place the honey, coconut oil, and butter in a small saucepan and heat on low, stirring frequently, until just melted and well-combined. 
In a large bowl, combine the oats, millet, sorghum flour, teff flour, tapioca flour, sunflower seeds, shredded coconut, raw sugar, cinnamon, baking powder and salt. Stir well to combine.
Pour the honey mixture over the oat mixture, and mix with a spatula until homogenous.
Beat the eggs lightly in a small bowl and pour over the oat batter. Mix and fold in the eggs until everything comes together and the mixture is thoroughly combined.
Divide the mixture among the prepared muffin holes.
Bake 30-35 minutes, or until the muffins have risen and the tops and sides are golden.
Remove the pan from the oven to a wire rack and let the muffins cool 10-15 minutes.
(Initially the muffins are soft and crumbly- too delicate to remove from the pan successfully, so they require a little cooling time so that they firm up enough so each can be extracted in one piece.)
Gently run a knife along the perimeter of each muffin and remove from the pan to cool on a wire rack.
The muffins can be stored several days at room temperature in an airtight container (otherwise, they would probably freeze well for another day).

Friday, January 3, 2014

Thai Red Curry Sweet Potato Soup with Lentils


I know I've said it before: I love soup.
But I love it most especially in the wintertime.
It makes a comforting sort of meal, it can be filling, or just a little warming.
As much as I love it, I could never understand a friend who absolutely hated it. There are so many kinds of soup, how can you hate a whole genre of food (if we have the ability to use the word 'genre' as far as food classifications go...).


However, I think it was decided that the texture was a problem for her (especially broths). But there again, I'm confused since there's more than one soup texture and so much soupy variety.
Eating a whole dinner with a spoon? Was that it?
I couldn't tell you, I don't know.
I would have thought she was a picky (boring?) eater, but that's not necessarily so- she loved mushrooms, which can be a hotly contested food in the love vs. hate argument.


Anyway... it's all incredibly interesting stuff to everyone, I'm sure.

Just a quick little snippet, but I wanted to post this recipe for a new-ish soup favorite with some wonderful flavors.
It includes lots of warmth and freshness with a bit of heat (though it doesn't linger too long if you're concerned about that), plus some zip from the fresh ginger and lime.


There's a bit of pleasant "pop" from the lentils. If you're concerned about the color, you are of course welcome to choose red lentils for your version (better camouflage).


Thai Red Curry Sweet Potato Soup with Lentils
Adapted from a Donna Hay Recipe
serves 4-8

1 T (15 ml) veg oil or coconut oil
1/2 c (60 g) minced shallots 
3 cloves garlic, smashed and roughly minced
1 1/2 T (24 g) finely grated fresh ginger
1/4 c (55 g) Thai red curry paste
1 qt/1 L chicken or vegetable broth
1 can (400 ml) coconut milk
scant 2 lb (850 g) sweet potato, peeled and chopped into rough cubes
3 T (45 ml) fresh lime juice
1/2 c dry lentils (105 g)
salt
pepper

To serve (as desired):
chopped cilantro
fresh limes
chili paste

Heat the oil in a large saucepan over medium heat. Add the shallot and saute for a few minutes until softened. Add the garlic and ginger and saute for about a minute to warm through. Add the curry paste and cook for another minute.  Pour in the broth and coconut milk, add the sweet potato and lime juice, and bring the mixture to a boil. Reduce the heat and simmer about 30 minutes, or until the sweet potato is tender. 

While the soup cooks, work on the lentils. 
Rinse the lentils with cool water, add to a saucepan, and cover with about 2 inches of water. Add a bit of salt and bring to a boil over medium heat. Reduce the heat and simmer about 30 minutes or until the lentils are cooked, but still firm (if you're not familiar with your particular type of lentils, this could take anywhere from 20-40 minutes or so... it's recommended that you test them after the first 20 minutes). 
Drain the lentils and set aside. 

When the sweet potato is fork-tender,  remove the pan from the heat and puree the mixture with an immersion blender until smooth (or carefully in batches in a blender on the countertop).
Taste for seasonings and add salt and pepper as necessary. 
Stir the lentils through the warm soup or add them to individual bowls, and serve the flavorful garnishes alongside.

Monday, December 9, 2013

Basics: Popcorn... and Salted Caramel Corn


I thought I would take a little break and insert a simple recipe here, it's been a while. 

Really, basic popcorn is very easy, and I prefer it so much to any bagged microwave popcorn.
You can flavor it however you wish, and more likely than not it'll be less salty and greasy than anything you'd pull out of the microwave.


Here in the US most corn you can find for purchase is GMO. However, popcorn is not; popcorn wouldn't be popcorn if it were modified. It wouldn't pop if it's structure were changed.

Some nights dinner is light and simple over here- a pureed soup and popcorn. Maybe a salad on the side, perhaps apples, pears, cheese, and almonds.


Sometimes I like to use coconut oil and add a little salt and curry powder to the finished popcorn.
Other times, maybe and a different spice blend.
Truffle salt?
Rosemary or garlic infused oil?
Finely shaved Parmesan?
Dill, onion and garlic powders?


I was thinking about making homemade Christmas gifts this year- and making things that are consumable. Things that are generally used, enjoyed and gone. They don't have to be put away, they take up space on a mantle, no one has to wonder, 'now what am I going to do with this?!' and hopefully no one feels the need to re-gift them.


I can't make any promises, but I was hoping to post a few things that might make nice gifts.
Well, other than gifting purposes, caramel corn is also good to have around for a party or if you're expecting people to stop by and visit.

This is a caramel corn version without the use of corn syrup, and I'm happy it worked out.
The idea comes from Alana Chernila's Homemade Pantry, where there's a recipe for maple caramel corn.
I liked that recipe enough initially, thought it wasn't my all time-favorite, and I wanted to make some changes.


The most notable change is the use of golden syrup.
Golden syrup is a gorgeous raw sugar syrup, already caramel-y, a little deep with some molasses notes- really great stuff.

I'd like to tweak the maple syrup recipe to make it more to my liking, but that will have to wait a little bit for sometime down the line.
Maybe I'll try another time with little molasses in the mix, or honey, perhaps different types of sugar.

Also, as an aside, if you're wary, I would recommend starting with less salt than called for. Perhaps go for 1/2 t (3 g) and add more after tasting the caramel but before adding the baking soda. I've used both amounts, I like both but I would say it depends on personal taste. The baking soda adds some semblance of salinity if that helps at all.

And be careful of hot syrups... hot sugar = nasty burn.


Additions for the caramel corn I'd like to try including:
a little cinnamon stirred into the caramel at the end of cooking
maybe a little chili powder
slivered almonds or pecan pieces sprinkled on top before baking
drizzle of melted and tempered chocolate after the popcorn has cooled
dried cranberries stirred in at the end

Basic Popcorn
makes about 9 c (around 2 L)

1/2 c (110 g) popcorn kernels
2 T (30 ml) cooking oil (such as grapeseed, safflower, sunflower, or coconut)
Seasonings, as desired

In a 5 qt (about 5 L), heavy dutch oven heat the oil over medium-high heat until it shimmers. Add the popcorn and shake the pan to distribute evenly. Cover the pan and continue to cook, shaking occasionally at first, then more vigorously when the corn really starts to take off. 
Once the popping starts to diminish, and there are 2-3 seconds between pops, take the pan off the heat. Remove the popcorn to a large bowl, set aside if using for caramel corn, or season as desired.

**************************

Salted Caramel Corn

9 c popcorn (see above recipe)
7 T (100 g) unsalted butter
1/2 c (120 ml) golden syrup (preferably Lyle's)
1/3 c plus 1 T (93 g) raw cane sugar
3/4 t (5 g) fine sea salt 
1/2 t (5 ml) vanilla extract
1/2 t (3 g) baking soda (bicarbonate)

Preheat oven to 225 F/110 C.
Lightly grease a 4-sided sheet pan and set aside. 
In a medium saucepan, combine the butter, syrup, sugar, and salt. Stir over medium heat until the mixture comes to a boil. Stop stirring, and let the caramel cook 5 minutes. Remove the pan from the heat and stir in the vanilla. Add the baking soda, and stir (careful, it will foam up). 
Pour the caramel over the bowl of popped corn and fold quickly but carefully, so as to coat, but not deflate or crush the popcorn too much (don't worry, it doesn't have to be perfect- the caramel will even out a little later). 
Place the pan of popcorn in the oven and bake 1 hour, stirring every 15 minutes. 
Remove the pan from the oven and stir again. Let cool completely, stirring every few minutes until the popcorn no longer adheres to the pan. 
Once cool, store in an airtight container. 
Best within 5 days. 

Sunday, December 1, 2013

Baking Bread in Gabon


There is a future plan for a boulangerie with a wood-fired brick oven at the mission. 
Pretty neat, but you have to remember that a boulangerie in Africa will probably be a bit more rustic than one in France.

For one thing, "climate control" isn't usually going to be an option. Don't get me wrong, it certainly can be, but it's not something many people are really used to in day-to-day life.
Plus, the money has to be there for the endeavor, and pretty much all the necessaries would have to be imported.

If you're in Africa, making baguettes may not be quite as straightforward as it would normally be.
You'll have to make some changes, to adapt.

Baguettes should take at least 12 hours from start to finish, and preferably more time for a better flavor development. While the dough rises, you'll need to protect it.
In the bakery, there are several inches of  space between the tops of the four walls and the overhanging roof.  Sometimes lizards hang out on the tall ledge and look down on what was going on below. Maybe it was curiosity, maybe it was strategy, but some evidently made their way down into the bakery overnight (hey, they leave evidence).


Lizard skin and pieces of butterfly wings- it looks like it must have been a pretty one, but the butterfly lost. I don't think it had a chance.

And no joke, bugs are prevalent. From les petites fourmis, to les mouches, to... I don't even know what many of those bugs were called since I'd never seen anything like them before, you'll have to keep
them out of the rising bread dough.
The setup is a little more rustic, so if you plan to bake, this is where the adaptation comes into play. 

Though it didn't matter what had gone on the previous afternoon, I would walk in pretty much every morning to find at least a few bugs on the counter, dead or alive.

To keep the little things out during overnight rising, you could use an overturned storage box. 


Everything is protected, fully contained, and the rising environment stays warm and consistent.

While a tile-topped counter is definitely a plus for kneading and rolling dough, a water bottle filled with ice water can make a suitable substitute when there's no rolling pin. 


In a pinch a floured bed sheet will suffice as a baguette couche. 


If you don't have a razor to slash the bread, a sharp (and clean) pocket knife will do the trick. 


Even if the situation isn't completely ideal, you can still figure things out- and maybe the challenge makes it more worthwhile.

Monday, November 4, 2013

What Are We Working With?


In this area of the world AC is rare. Not many have cars. No running water- bathing is done in the river or with the jugs of water someone has carried back home. Electricity in the little shack? Nope. 
Interestingly, everyone has a cell phone, but it'll only be re-charged if an extra outlet is found when people are out and about.


Children don't really have many toys, and in fact we saw some playing with trash. Taking a walk and trailing a plastic bottle on the ground which was connected to a stick. Maybe it was a car, maybe a boat, perhaps it was a pet...
Although sad, it made me think about "the occupation of being a child" from what should be considered my "real" job. Being a child involves filling time with play, activity, and imagination. That's their job, and it's how they learn.
Toys do have a purpose, though they don't require plastic and bright colors. Really, with a little imagination a simple stick can be a fine toy.
Even more sad, some children didn't seem to play at all, but just sat around outside in the dusty red dirt all day.
Many of the adults don't present a good example of keeping themselves occupied during the day either.
In my own American life, I can't say I could do that. Not doing something, not getting anything done all day every day would drive me crazy.


You might think that people would be bothered by this, but from what I heard they don't consider themselves poor or pitiable in any way.

Some people only eat once a day, and even then, it may only be manioc.
Mixed with water, wrapped in banana leaves and steamed, it's pasty and grey-ish, without much flavor at all.
In fact, a lot of the diet seemed to be starchy. There was rice, green plantains, taro, the manioc... at least one African meal had all of these things along with chicken and a condiment of very hot crushed fresh peppers.
Yes, lots of flavor and pain in those peppers. 

My purpose in Gabon, as I had said before, was to teach simple baking, and I really wanted to use what was easily available for that purpose.  I wasn't really sure what I would find.


Amazingly, baking soda (bicarbonate) is available only in the capital, Libreville. 
Baking soda can no longer be taken for granted- it made me think about how I couldn't just run out to the store and pick up even something that simple. If you don't have baking soda, there are a lot of baking options that suddenly disappear.


In Mouila, the grocery stores are not packed chock-full of your wildest supermarket shopping dreams.
The couple stores we did see were far more basic than what we're used to. Bags of rice, flour, sugar, butter, shelf stable milk, red palm oil, eggs, cookies, cans of applesauce imported from Belgium (in fact, most everything is imported, some from Brazil (!?) of all places, but much of it from France... and I'm going to assume this is the case because Gabon is a former French colony).
As small as these bare bones stores were, they did have a very impressive array of liquor for sale.
Chocolate? You can choose between Nesquick and a Nutella knockoff.


When I saw there was Nutella-ish-ness available, I thought I could make a chocolate-hazelnut cookie with the inspiration from good old peanut butter cookies. Although it didn't turn out like a peanut butter cookie, they were successful in their own way as thin and crispy chocolate wafers. Leavening turned out to be completely unnecessary in this case.


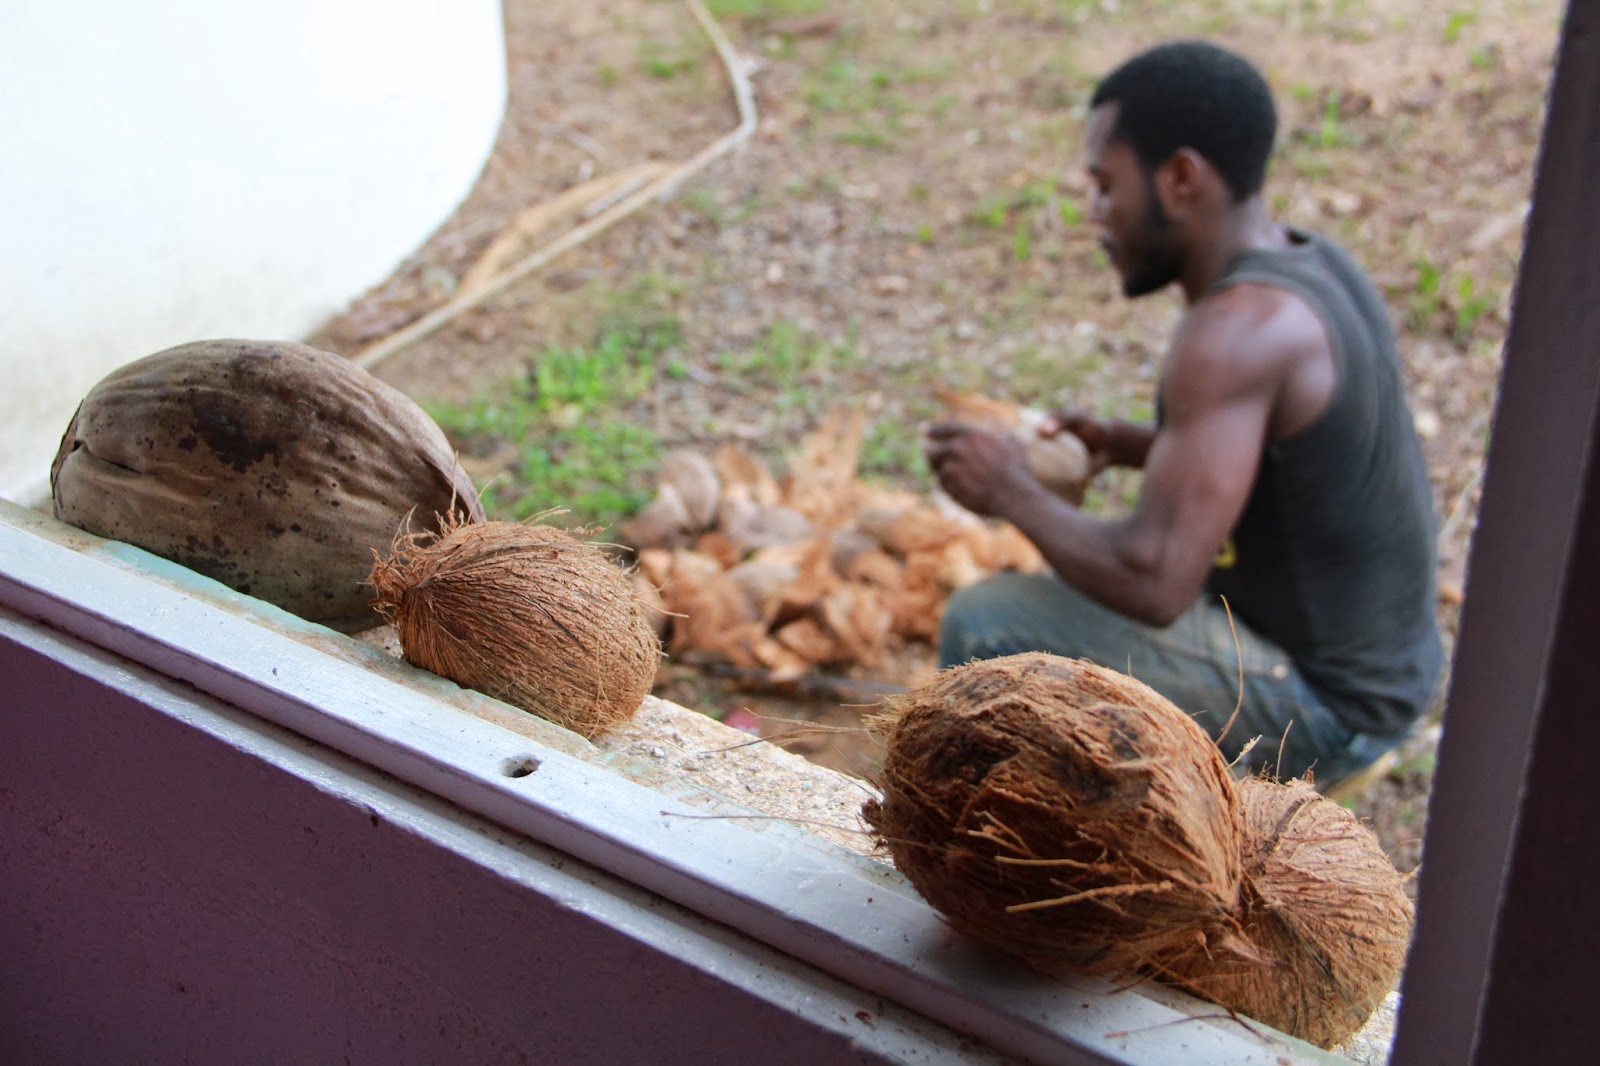
The nice thing about this area of Africa is that the fresh fruit is literally growing right outside.  Depending on the time of year there choices could include papayas, mangoes, lemons, limes, bananas, grapefruit, pineapple, and coconut.


I had initially thought that shredded coconut wouldn't be such a hard thing to find.
Think again: you'll probably have to do it yourself.


First thing's first: find someone who's handy with a machete.
Coconuts right off the tree need to be peeled with a machete so the husky brown shell is exposed.


Then the top is cut off so the coconut water can be drained. And wow. It's so much sweeter and flavorful than the boxed coconut water you find at the grocery.


The next step is to whack the shell with the back of a knife so that the shell cracks, and then wedge the knife blade between the shell and the meat to get the meat off the shell in large chunks.


The coconut is grated by hand, then dried a bit in the oven before the coconut macaroon batter is mixed.
Coconut macaroons are so much better when made with fresh coconut as compared to the dessicated stuff from the store back home...