Friday, May 31, 2013

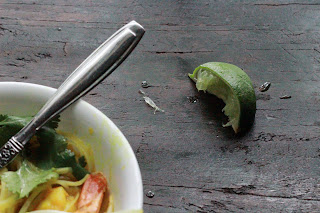
Shrimp Laksa


Sometimes I just want a really good bowl of soup.


Laksa is a Malaysian soup that fits the bill today- it's spicy, sweet and savory (plus, it's got a sunny yellow hue thanks to turmeric).
And you don't have to go to a restaurant for it.


It's a flavorful broth, filled out with coconut milk and poured over rice noodles with garnishes to add textures and flavors.


There's a slight funk with the shrimp paste and fish sauce, but it's still fresh due to the green onion and cilantro. So much all in one bowl.


Other options/additions:
pumpkin
tofu
green beans
mushrooms
rice instead of rice noodles
red pepper or chile as a garnish
sliced cucumber as a garnish
fresh mint leaves


Shrimp Laksa
Adapted from a Gary Mehigan recipe
serves 4-6

1 lb. (450 g) raw shrimp, shells on
2 inch piece of fresh ginger, peeled and roughly chopped
1 stalk lemongrass, outer leaves removed and tender inner white part chopped
4 shallots, peeled and roughly chopped
4 cloves garlic, peeled and crushed
1 jalapeno chile, stemmed, seeded, and roughly chopped
cilantro (coriander) stems (1/2 the bunch if large, all if it's smaller)- reserve the leaves 
2 t (20 g) shrimp paste
3 T (45 ml) peanut or coconut oil
2 t (5 g) ground turmeric
13 oz (400 ml) coconut milk
4 c (950 ml) vegetable stock
3 T (45 ml) fish sauce
1 T (17 g) brown sugar or palm sugar
kaffir lime leaves (optional)

To serve:
5-7 oz (150-200 g) rice noodles 
sliced green onions
cilantro leaves
bean sprouts
lime wedges
chili sauce on the side if anyone is so inclined

Peel and devein the shrimp, leaving the tails intact. Set the shells and shrimp aside in separate bowls. 

To make the laksa paste:
In the bowl of a food processor (or with a large mortar and pestle), puree (or pound) the ginger and lemongrass. Add the shallots and continue to work the mixture so it forms a paste, scraping down the sides of the food processor or redistributing the contents of the mortar as necessary. Add the garlic, jalapeno, and cilantro stems and continue the process. Add the shrimp paste and work it through the laksa paste until everything is well-combined. 
Set the mixture aside. 

Heat the peanut or coconut oil in a large saucepan over medium heat. Add the reserved shrimp shells and saute about a minute or until they turn pink. Add the laksa paste and ground turmeric and saute, stirring often, about 5 minutes. Pour in the coconut milk and reduce the heat to low. Stir the mixture and scrape the bottom of the pot to release any of the paste that might have adhered. Continue cooking the coconut milk mixture about 5 minutes, stirring occasionally. 

Add the vegetable stock, fish sauce, brown sugar, and several kaffir lime leaves (if using). Increase the heat back to medium and bring the mixture to a boil. Reduce the heat to low and simmer the soup 20 minutes, stirring occasionally. 
With a large slotted spoon, strainer, or spider, remove the shrimp shells and lime leaves. 
Add the raw shrimp and cook on low 2-3 minutes, until the shrimp are pink and cooked through. 

Meanwhile prepare the rice noodles per package instructions (usually soaking in hot water a few minutes). Divide the noodles between bowls and pour the hot laksa broth over the top. Add bean sprouts, cilantro leaves, and sliced green onions. Top with a few shrimp and serve with lime wedges and chili sauce. 


Sunday, May 19, 2013

Passion Fruit Curd


Passion fruit is fantastic.
I do love them, but can't get my hands on the things nearly as often as I would like.


Tropical and tangy, a little of the fresh fruit goes a long way.
Generally, white and creamy foods (whipped cream, for instance) pair especially well with the sharp fresh passion fruit scooped right from the rind. Creams seem to tame some of that sharpness.


Yes, there are some things you should never try to improve upon. Perfectly ripe peaches right off the tree can be one of those things. You have to admit cooking perfect peaches can be downright wrong.
So why would I ever mess with a perfect, fresh passion fruit?
For one thing, I can go to an orchard and pick those perfect peaches off a tree.  However, it's much less plausible that I've gone out in the recent past and picked perfectly ripe passion fruit off a vine (or off the ground).
Sorry, but since I'm not in passion fruit territory the opportunity has not presented itself.


That said, those I am able to snap up at the store are more than likely not going to be at their maximum potential (though a little time on a windowsill or in a paper bag can do them good).


Although perhaps unable to reach the epitome of flavor where I am, passion fruits with the best possible potential can be sought. First, if they're the purple variety, deep purple is good (as in NOT blue-grey or brown), and maybe with a tinge of magenta. The skin does not necessarily have to be perfectly smooth, and in fact wrinkles can be a good thing. 
Fruits that feel heavy for their size are also good. Try holding one in each hand to compare weights.  
If there's something inside that rattles around when the fruit is lightly shaken, you don't want it. The juice and pulp are likely dried out and what's left inside is probably just a gummy mass of seeds.


Turning passion fruit into a curd (like the more familiar lemon or lime curd) does tame the flavor, but it also serves the dual purpose of making it more rich and extending the flavor a bit


How to use it?...


over meringues and topped with whipped cream (maybe with a layer of strawberries under the cream)
between layers of a cake
with cheesecake
as part of a trifle
maybe with a vanilla pot de crème/coeur à la crème/plain yogurt
on a fruit salad (strawberries, raspberries, lime zest, maybe some coconut and/or mango)
served with scones
with shortbread
on toast (who doesn't want passion fruit with their toast in the morning?)
with dark or white chocolate mousse
as a macaron filling


Passion Fruit Curd
makes about 3 cups (720 ml)

7 fresh, ripe passion fruit
8 T (113 g) unsalted butter, at room temperature
1 c (200 g) sugar
1/4 t (2 g) salt
2 large eggs
1 large egg yolk
2 T (30 ml) lime juice

Cut four of the passion fruits in half and scoop the pulp and seeds into a blender. Blend about 20 seconds or so to free the juice from the pulp and seeds. Pour the mixture through a fine-mesh strainer into a small bowl, stirring the mixture and pressing the bits of seeds and pulp with the back of a spoon to extract as much juice as possible. Cut the last three passion fruit and scoop the seeds and pulp into the bowl with the just strained juice. Set aside.

In the bowl of an electric mixer fitted with the paddle attachment, beat the butter about 10 seconds until creamed. Add the sugar and salt and beat again until light and fluffy. Add both of the eggs as well as the egg yolk and beat again until combined, scraping the sides of the bowl and re-beating if necessary. Pour in the bowl of reserved passion fruit juice and seeds, along with the lime juice. Give everything a quick mix and scrape the contents of the bowl into a medium saucepan.

Heat the mixture over low heat, stirring constantly. At first things will look a little strange, but once the butter melts and everything starts coming together nicely you know it'll turn out ok.
Continue cooking and stirring until the mixture becomes creamy and thickens- at least thick enough to easily coat the back of a spoon (this will take at least 5 minutes). Remove the pan from the heat and pour the passion fruit curd into a bowl or jars to cool. 
Once cool, cover and refrigerate until ready to use.


Tuesday, May 14, 2013

Growing Ginger


This actually wasn't one of my thoughts or plans for this month, but it certainly serves the purpose.
I started writing this post and taking photos quite a while back, in fact more than a year ago, but never quite finished or found a good time to post it. I decided to resurrect it.


Last year I bought a large container of fresh organic ginger.
I used most of it.
However, when the unused bit was left alone and forgotten in a cool and dark place, it sprouted.
So, technically it was still... alive.


I asked a gardening expert about growing ginger, but she didn't know, which is, I suppose, understandable.
It's probably due to the fact that there's not much call for growing tropical ginger in temperate Missouri.
A little research ensued...
I soaked the piece of ginger overnight in water, filled a large pot with soil and compost, placed the ginger in the pot close to the surface (bud facing upwards), covered it in about 1/2 inch of soil, and placed it outside.

It worked.

Young Ginger

Ginger needs to be watered frequently. Not so much water that it drowns, but being tropical it's a plant obviously used to humidity. The soil needs to be damp, but it also needs some drainage at the bottom of the pot.
The plant was left outside from about April to mid-October, and when the weather became cold the pot moved indoors for a while.
The great thing is that it was viable. Growing ginger in middle America is not impossible.

Ginger, being a root, won't actually be visible as it grows.
But of course, you'll get some above-the-ground bamboo-like foliage to let you know that it's healthy and growing. The leaves and stems smell nice and gingery- definitely a plus.
And I've read you can steep the leaves in boiling water to make ginger tea.


There is a difference between the older, papery-brown skinned pieces of ginger you will find in the store and fresh young things potted in the back yard.
Younger ginger is less tough and stringy in texture, and the flavor is more delicate, not as strong. To use, dig up the root, cut off what you need, and bury the rest so it keeps growing.
However, I've read that the best time to harvest everything all together is once the leaves start dying. Some of it is saved for re-planting, other pieces can be frozen for later use.

Ginger grows best when started in the spring. But once it's begun, if taken care of it will grow year-round. When you go to the grocery store, just look for a really healthy piece of ginger with small delicate buds on it. They may be a lighter cream color and not covered in the papery skin, they may even be a little green- but the buds will certainly look tender when compared to the more mature ginger.

This was mostly an experiment for me. It turned out pretty well and I think I'll do it again.
It's doable and certainly a feasible option for anyone who might really like fresh ginger and be interested in growing it.


So, the ginger had been growing for 18 months to 2 years. 
I didn't really harvest much until just now when I dug up all of it.  
In large part the reason for this drastic move was because I didn't think the pot in which I'd planted the ginger could take it any more. Besides, the stems and leaves had turned brown a while back and the plants had been cleaned up a bit. All that could be seen at this point were little knobs of ginger root poking above the soil's surface all over the pot. 
And so, the pot was pretty much emptied of it's contents, the roots were trimmed up and cleaned off, rinsed, and set outside to dry a bit. 
I ended up with about 2 1/2 lb. (more than 1 kg) of ginger.
Some will certainly be saved and re-planted, perhaps in a pot that's a little wider and a bit more shallow. 

I have a penchant for fresh ginger.  It's a good thing because I now have plenty to use.

So far, I think my favorite posted recipes including ginger have been:

Carrot Soup
Butternut Squash and Apple Soup
Sweet Potato Casserole
Cardamom Chicken Curry
Vegetable Korma
Kedgeree
Rice Bowls
Thai Green Chicken Curry


When dealing with fresh ginger, I find the best way to peel it is using a spoon. The papery skin comes off easily and you don't lose any of the actual ginger (as you might with a peeler or a knife).

Sometimes we really like to make a ginger tea. It's very easy, and there's no real set-in-stone recipe, just guidelines. I usually eyeball everything.
Place slices of fresh ginger in a pan of water and bring to a boil (I like to be generous with the ginger). Boil for 10 minutes or so and then let it steep for another 10. Strain the ginger tea into glasses, add some fresh lemon juice and honey to taste. If the ginger happens to be too strong, just dilute with some hot water.

Tuesday, May 7, 2013

Orange Polenta Cake


Slightly sweet and great with coffee or tea in the afternoon, it's a cake version of the polenta cookies I love.
The outside edge gets a little crispy, while the inside remains dense with a mostly tender crumb (well, there's some crunch and gritty texture due to the coarse polenta).
Maybe the contrast is part of what I like about it.


Polenta is cornmeal, but it's not the fine, sandy version that one would use for something like an American corn bread. It has a more basic texture (not in a bad way)- it's got more body to it. The texture is first easily identified by sight.  In the photo above, cornmeal is on the left and polenta on the right.


There's some orange for added flavor, but olive oil gives the cake an additional and different fruity flavor.
The difference isn't overpowering, and maybe no one would even know it's there. But to me, since I know it exists in this cake, and perhaps because of what I associate olive oil with, it adds an almost slightly savory edge to the cake.


If you're at all skeptical and worried about olive oil in a dessert, go ahead and use butter, but I would at least encourage you to try a mixture of half olive oil and half softened butter.


And I know it can be difficult to wait until a cake is completely cool to cut into it, but try to resist. The flavors meld better upon cooling and the cake is less eggy.


Other additions to the cake:
lemon zest
maybe a bit of minced fresh rosemary
some vanilla
toasted pine nuts


Serving suggestions:
whipped cream, whipped mascarpone (or a combination of the two)
powdered sugar
fresh berries
fruit compote
candied oranges in syrup


Orange Polenta Cake
makes 1, 10 inch (26 cm) cake

1 1/4 c (215 g) polenta
3/4 c (80 g) almond flour
2 T (20 g) corn starch
1/2 t (4 g) salt
1/2 t (3 g) baking powder
2/3 c (160 ml) olive oil
1 c (200 g) sugar
2 navel oranges
1 small lemon
3 large eggs

Preheat the oven to 325 F/160 C.
Grease the inside base and ring of a 10 inch/26 cm springform pan with butter. 

In a medium bowl, whisk together the polenta, almond flour, corn starch, salt and baking powder. Set aside.
In the bowl of a food processor pulse the olive oil and sugar until combined. Add the eggs, the orange zest and juice (which came to about 3/4 c or 180 ml), the lemon zest and juice, and pulse again until fully combined.
Carefully scoop the contents of the polenta and flour mixture into the food processor and pulse several times until fully incorporated.
Pour the batter out into the prepared pan. The batter may seem a little soupy, but that's alright. The liquid will be absorbed and everything will come together once the cake is baked. 

Place the pan in the preheated oven and bake about 50 minutes, or until a toothpick inserted near the center comes out clean or with a few moist crumbs. 
Let the cake cool on a wire rack about 20 minutes, then remove the outside ring of the pan to allow the cake to cool completely. 
Serve as desired.